The yard
Your ship is made of parts, such as a hull, a drive, a tank, a hold, a mining head and an extractor. Your ship builds new parts from blueprints, wherever it is, and you fit them while it is docked at a station.
Blueprints
Open the yard from Yard in the Ship section, wherever your ship is; its back arrow takes you back to Ship. It lists the blueprints in groups, what you can build now, what you are short of materials for with how many tonnes, and what needs research first. Each blueprint builds a single part. The parts your ship starts with carry no numeral, and the better ones carry the numeral of the research they need first, as Mining I opens Mining head I.
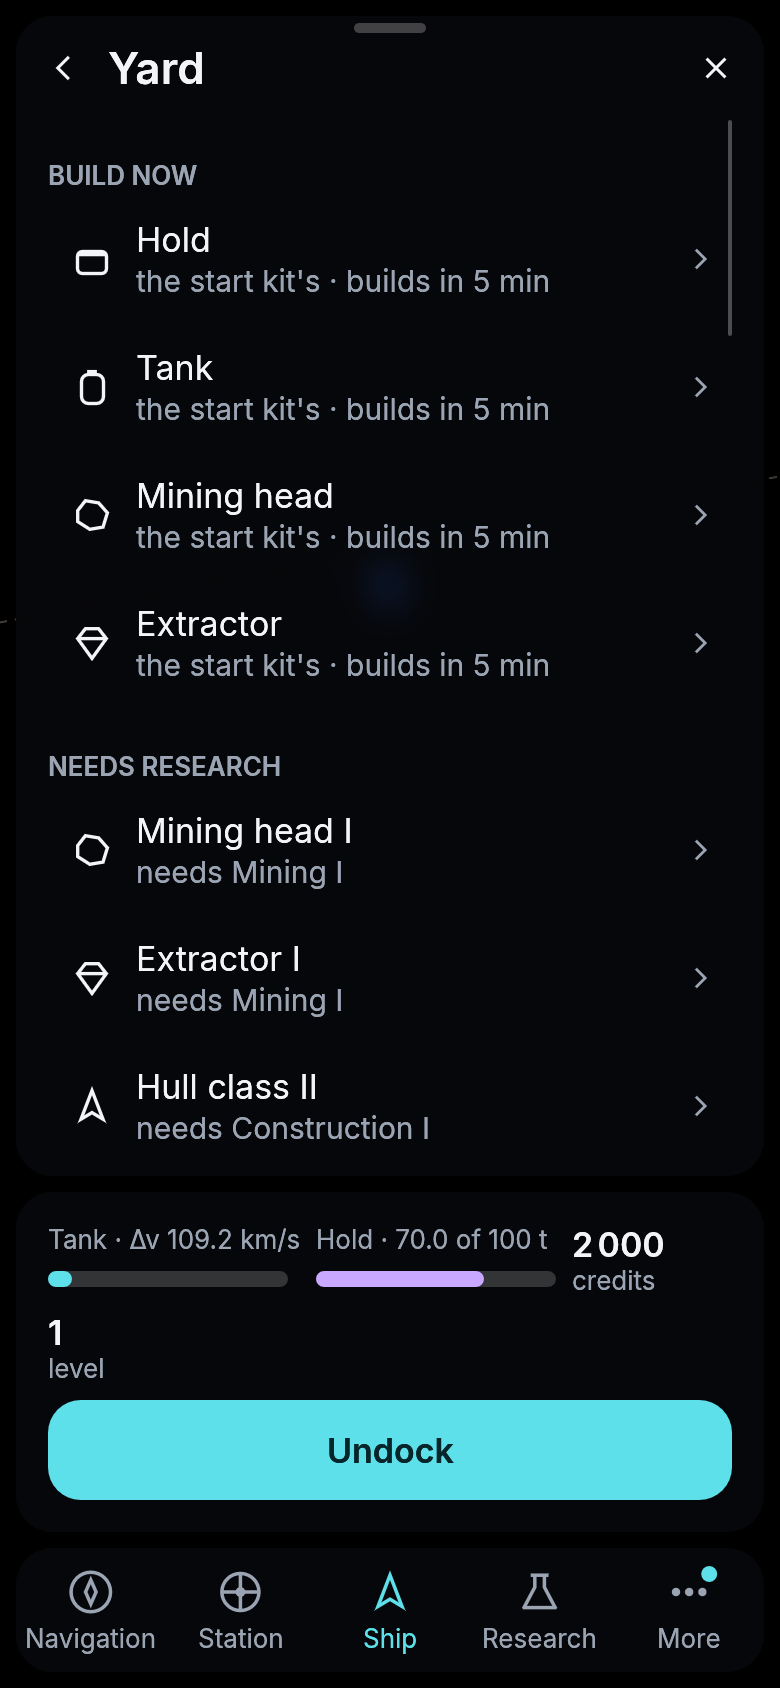
The yard with the materials for the start kit’s parts in the hold. Every pilot can build the class-I set from the start.
| Blueprint | Takes | Materials | Needs |
|---|---|---|---|
| Hold | 5 min | 10 t silicate, 3 t carbon, 1 t metal | nothing |
| Tank | 5 min | 8 t silicate, 4 t carbon, 1 t metal | nothing |
| Mining head | 5 min | 6 t silicate, 2 t carbon, 1 t metal | nothing |
| Extractor | 5 min | 5 t silicate, 5 t carbon, 1 t metal | nothing |
| Mining head I | 10 min | 12 t silicate, 4 t carbon, 2 t metal | Mining I |
| Extractor I | 10 min | 10 t silicate, 8 t carbon, 2 t metal | Mining I |
| Spider mine | 30 min | 60 t silicate, 20 t carbon, 5 t metal | Mining II |
| Tower mine | 45 min | 80 t silicate, 25 t carbon, 8 t metal | Mining II |
| Ring mine | 30 min | 50 t silicate, 20 t carbon, 8 t metal | Mining II |
| Hull class II | 1 h | 120 t silicate, 40 t carbon, 15 t metal | Construction I |
| Wheel station | 6 h | 400 t silicate, 150 t carbon, 40 t metal | Construction II |
| Spine station | 6 h | 450 t silicate, 150 t carbon, 50 t metal | Construction II |
| Fusion drive I | 20 min | 15 t silicate, 5 t carbon, 3 t metal (free and 2 min in the tutorial) | Drives I |
| Fusion drive II | 40 min | 25 t silicate, 10 t carbon, 6 t metal | Drives II |
| Fusion drive III | 1 h 30 min | 40 t silicate, 15 t carbon, 10 t metal | Drives III |
| Mining head II | 30 min | 25 t silicate, 8 t carbon, 5 t metal | Mining II |
| Extractor II | 30 min | 20 t silicate, 15 t carbon, 5 t metal | Mining II |
| Skimmer I | 2 h | 30 t silicate, 10 t carbon, 15 t metal | Mining III |
| Probe bay | 20 min | 6 t silicate, 2 t carbon, 3 t metal | Comms II |
| Radar I | 10 min | 8 t silicate, 2 t carbon, 2 t metal | Sensors I |
| Radar II | 30 min | 15 t silicate, 4 t carbon, 5 t metal | Sensors II |
| Telescope I | 15 min | 12 t silicate, 2 t carbon, 3 t metal | Sensors I |
| Telescope II | 45 min | 25 t silicate, 5 t carbon, 6 t metal | Sensors II |
| Telescope III | 2 h | 50 t silicate, 10 t carbon, 12 t metal | Sensors III |
| Railgun I | 10 min | 4 t silicate, 2 t carbon, 6 t metal | Weapons I |
| Launcher I | 15 min | 4 t silicate, 4 t carbon, 8 t metal | Weapons I |
| Point defense I | 10 min | 3 t silicate, 1 t carbon, 4 t metal | Weapons I |
| Railgun II | 30 min | 8 t silicate, 4 t carbon, 12 t metal | Weapons II |
| Launcher II | 45 min | 8 t silicate, 8 t carbon, 16 t metal | Weapons II |
| Point defense II | 30 min | 6 t silicate, 2 t carbon, 8 t metal | Weapons II |
| Railgun III | 1 h 30 min | 16 t silicate, 8 t carbon, 24 t metal | Weapons III |
| Launcher III | 2 h | 16 t silicate, 16 t carbon, 32 t metal | Weapons III |
| Point defense III | 1 h 30 min | 12 t silicate, 4 t carbon, 16 t metal | Weapons III |
| Laser I | 2 h | 30 t silicate, 6 t carbon, 20 t metal | Weapons III |
| Torpedo tube I | 2 h 30 min | 10 t silicate, 30 t carbon, 40 t metal | Weapons III |
| Shield I | 10 min | 6 t silicate, 2 t carbon, 4 t metal | Defense I |
| Shield II | 30 min | 12 t silicate, 4 t carbon, 8 t metal | Defense II |
| Shield III | 1 h 30 min | 24 t silicate, 8 t carbon, 16 t metal | Defense III |
Mining head I mines twice as fast as the one your ship starts with, and Mining head II four times as fast. The extractors make propellant from a rock’s water at the same steps. Each step is a tonne heavier than the last.
Skimmer I takes the mining head’s place: a ship carries one or the other. It takes helium-3 out of a giant’s air (see mining and the market).
Radar I and II go on the hull’s radar mount and see other pilots’ ships twice and four times as far as the hull’s own radar (see your ship).
Railguns, launchers, point defense, lasers and torpedo tubes go on a weapon mount, and shields on the shield mount. What they do is told under fighting.
Fusion drive I replaces the drive your ship starts with. It throws its exhaust out just as fast, 1 000 km/s, so the same tank holds the same Δv, but it pushes twice as hard, a fifth of a g instead of a tenth, so every trip takes less time. It is also the drive that reaches the station at Pelagia. Like every fusion drive it carries a magnetic scoop that gathers hydrogen from the star’s wind. While your ship drifts, parked in orbit or waiting beside a rock, the scoop slowly fills the tank, about 30 tonnes an hour at Maren and more closer to the star. With it you can never be stranded. If the tank runs dry far from a station, wait, and the way home fills up by itself.
Fusion drive II pushes as hard as Fusion drive I but throws its exhaust out at 1 500 km/s, so the same tank holds half as much Δv again. A full tank of the start kit holds about 1 860 km/s instead of 1 250, and every round burns a third less propellant. Fusion drive III keeps that exhaust and pushes with half a g, two and a half times Fusion drive II, so every burn is that much shorter. Each is a tonne heavier than the one before, and every one from Fusion drive I reaches Pelagia.
Building
Tap a blueprint to see what it needs against what your hold holds, and while you are docked your vault as well, and says how many tonnes are short where there are not enough. A blueprint that needs research first has a button that opens that research. Build starts it if nothing else is being built and there is enough. The hold pays first and, docked, the vault pays the rest. A part is built aboard the ship you fly, docked, in orbit or on the way, on the ship’s clock, and the build keeps going while you are away. One part is built at a time.
A second ship, a mine or a station is too big to build aboard. You start those docked at a station, and they wait there when they are done.
A mine is not fitted to a ship either. It waits at the yard until you take it to a rock, see mines.
A second ship
Hull class II is not a part but a ship of its own. When it is built, it waits docked at the station with a drive, a tank and a hold, its tank empty. It has fifteen slots, two each for drives, tanks, holds and weapons, one each for a mining head, an extractor, a radar, a telescope, a shield and a probe bay, and one that takes any part. Two drives push together. Fill the tank at the market and fit parts at the yard, and choose which ship you fly in the Ship section.
Fitting
A finished part waits under Spare parts, in the yard and in the Ship section. While you are docked, Fit puts it on the ship you fly. It takes an empty slot of its kind if the ship has one, and otherwise the part of its kind, which becomes a spare in its stead. A part is not fitted if it would leave the hold or the tank smaller than what they carry.
Weapons, shields and the telescope show on the outside of the ship once they are fitted. A railgun puts a turret on each side of the hull, a launcher an armored box, point defense a white dome over its barrels, a shield an emitter on each side of the stern, and a telescope a long box near the bow. Other pilots see them too, so a ship’s guns are known before it fires. A ship without them shows bare rings where its weapons would go.
Next: Mines